ᴀᴜᴛʜᴏʀ : ʀᴀʏᴀɴᴇᴋᴄʜ
Objectives
- This section lists the objectives of this workshop, after attending the workshop, anyone should be able to hit these milestones:
- Understand what Audacity is and what it does
- Download and install Audacity on their computer
- Understand the concept of a project and be able to create one
- Understand the concept of the host, playback and recording devices and how to set them up
- Understand the concept of Stereo and Mono audio
- Understand the concept of tracks and how and when to use them
- Record voice directly from Audacity
- Import already recorded voice from another source
- Understand the concept of audio levels and clipping
- Make base edits to the voice tracks
- Understand sync-lock and when to use it
- Cut unwanted audio sections
- Arrange all the clips to make the complete voice track
- Understand the concept of destructive Nyquist effects vs. non destructive realtime effects
- Understand the concept of effects and how to apply them
- Build a basic processing chain appropriate for podcast voice
- Add background music
- Perform final mixing and level balancing
- Export the finished audio
Main
- This section contains the main portion of the workshop.
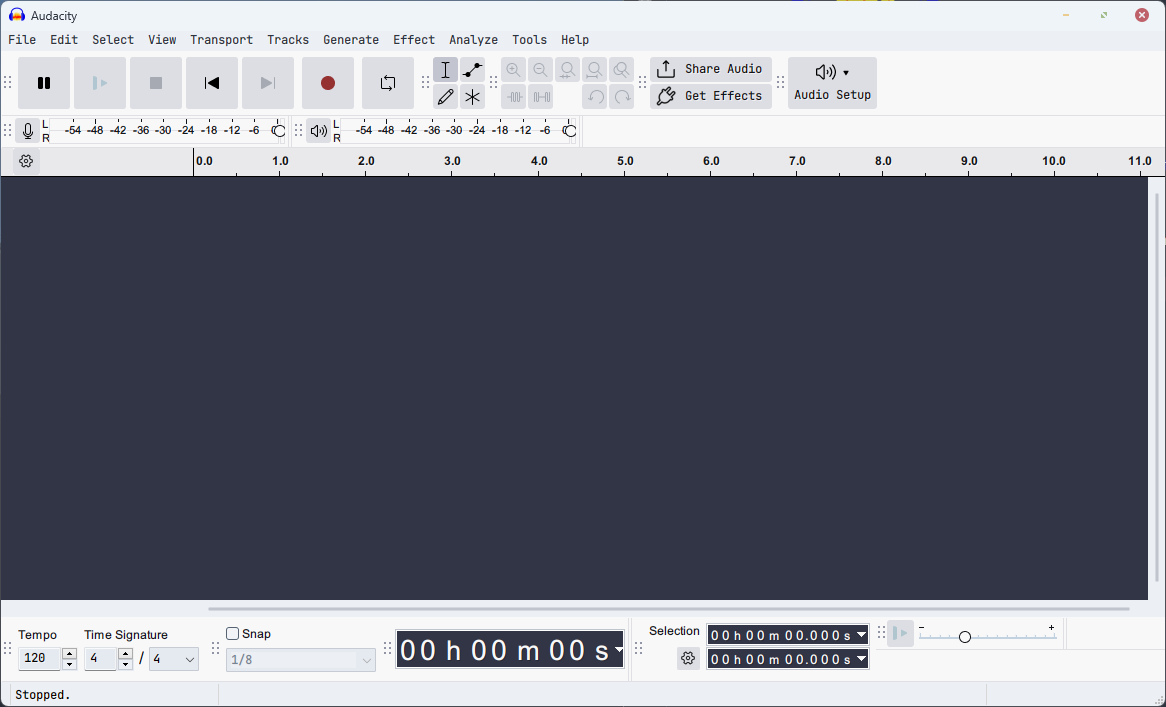
Audacity
What and Where
- Audacity is a free, open source, cross-platform software for recording and editing audio.
- Download it using this link
- Installation is straightforward; execute the installer and keep pressing next, then install.
Projects
- An Audacity project is the working file (.aup3) that stores everything you need to continue editing a session in Audacity without losing quality or edit information.
- Audacity automatically creates a project when it is launched, you can immediately start recording.
- Projects have proprieties like Sample Rate and Sample Format.
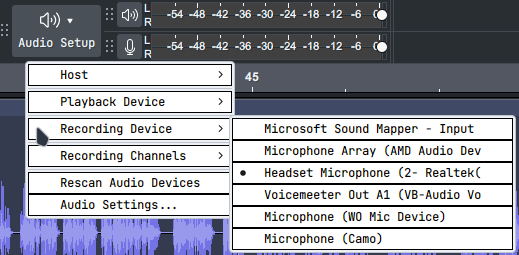
Setting up devices
- Click on the audio setup button, then hover over playback or recording device and select your preferred one.
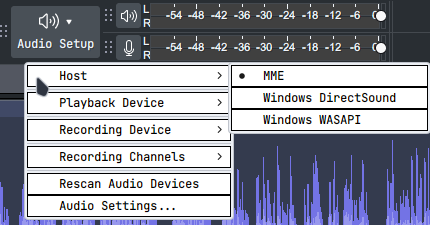
- (Optional) You can also switch your host between MME which only allows you to use inputs as recording devices to Windows WASAPI to be able to record your windows desktop audio.
Recording
- To start recording, first add a track
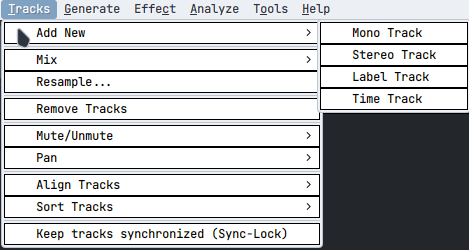
Mono vs. Stereo
- Mono and stereo refer to how audio channels are organized and reproduced.
- A mono track contains a single audio channel, the same signal is sent to every speaker or headphone channel.
- A stereo track contains two separate channels, labeled left and right. Each channel can hold a different signal, allowing sound to be positioned across the stereo field, creating a sense of space and width.
- Mono is often preferred for spoken-word content like podcasts because it ensures consistent volume and intelligibility across different listening setups and avoids phase or balance issues between left and right channels.
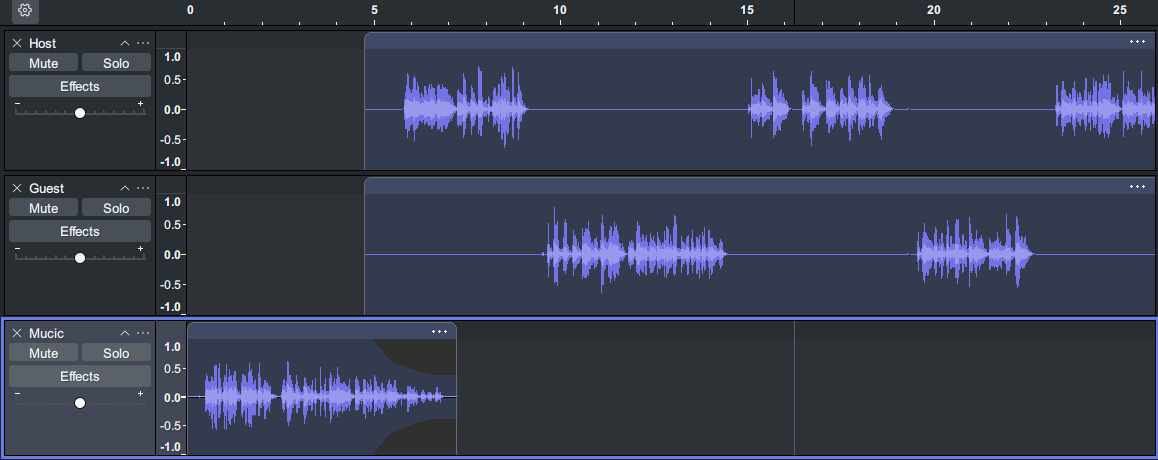
Tracks
- Track are individual layers of audio that you can record, edit, and mix independently inside a project.
- We use one track per person for podcasts with multiple people.
- Music and sound effects are also kept on separate tracks.
Recording voice
- After selecting a voice track, start recording by pressing the R hotkey or pressing the record button in the transport toolbar.

- Stop the recording by pressing the spacebar or the stop button.
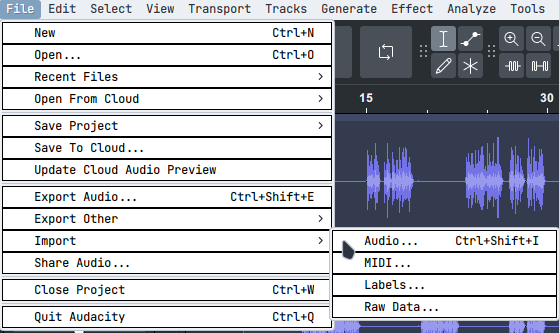
Importing voice
- If you’ve used an external device to record your voice, such as a smartphone you can then import the recording to audacity, it will directly appear as a separate track.
Audio Levels & Clipping
Levels
- Audio levels describe the strength (loudness) of an audio signal at any point in time. They’re used to monitor, control, and measure how loud recorded or played-back audio.
- Loudness is measured in dB (decibels) going from negative numbers to 0.
Clipping
- Digital systems clip at 0 dB. If the level reaches 0 dB or above, the signal clips and produces audible distortion.
Peak & Floor
- Peaks are the instantaneous maximum amplitude of the waveform, the highest positive or negative excursions you see on a waveform or meter. We typically keep peaks below a safety margin (for podcasts, often -6 to -3 dB)
- Floor is the baseline level of background noise in a recording (electronics, hiss, HVAC, etc.) if your voice sits too close to the noise floor, the recording sounds noisy. Your voice should be significantly louder than the noise floor.
Base edits
Sync Lock
- Sync-Lock is a feature that preserves the timing relationship between tracks when you perform edits that change their length or position. When Sync-Lock is enabled, operations such as cutting, deleting, truncating, or moving audio on one track will apply corresponding adjustments to other sync‑locked tracks so they stay aligned in time.
- If you recorded a multi-mic session or have voice plus music/effects on separate tracks, Sync-Lock prevents accidental misalignment when you remove or shorten material on a single track.
- Turn Sync-Lock on when you need to preserve alignment between tracks.
- Turn Sync-Lock off when you want to edit a single track independently.
- Use label tracks to mark sections before bulk edits; combined with Sync-Lock they make safe, repeatable timeline changes easier.
Base functions
- Cutting removes the selected audio from the timeline and places it on the clipboard so you can paste it elsewhere (Ctrl+X)
- Copying makes a duplicate of the selected audio on the clipboard without removing it from the timeline (Ctrl+C)
- Pasting inserts the audio from the clipboard at the current cursor position or replaces the selection with the clipboard contents (Ctrl+V)
- Deleting removes the selected audio from the timeline without placing it on the clipboard (Delete/Backspace)
- Undo reverses the last action to restore the previous state (Ctrl+Z)
- Redo reapplies an action you just undid (Ctrl+Y)
Generate Silence
- Generate Silence is a command that inserts a period of silent audio into a track at the selected location or replaces a selected region with silence. It’s useful for creating intentional pauses and preserving timing when removing audio.
- Shortcut: CTRL+L
Truncate Silence
- Truncate Silence is an effect that automatically shortens or removes extended silent passages in audio based on threshold and duration settings. It detects regions below a chosen dB level (the silence threshold) and either shortens them to a specified minimum length or deletes them entirely, which speeds up editing by removing long gaps without manual cutting.
- Use it carefully on dialogue to avoid cutting meaningful pauses or conversational timing.
Voice effects
Destructiveness vs. Non-Destructiveness
- Destructive effects permanently alter the audio data in your project when you apply them, changing the samples on the track itself so that the edit is written into the file; you can undo the change while the session is open, but once you save over a single copy or export only the processed file, the original raw waveform is effectively lost unless you kept a backup or duplicate track.
- Non‑destructive effects are applied only during playback or as a preview; they do not change the underlying audio samples until you choose to render or export them; this lets you tweak parameters and audition different settings without committing, keeping the original recording intact and making experimentation safer and faster.
Nyquist Effects
- Nyquist effects are audio plugins and scripts which Audacity includes to let users create and run custom signal-processing effects.
- Nyquist effects can perform tasks like EQ, analysis, noise reduction helpers, or bespoke transforms that aren’t available as built-in effects.
- Nyquist effects are flexible for automating repetitive edits, creating specialized filters or markers, and prototyping processing chains, but they run destructively like other Audacity effects, so save or duplicate tracks before applying.
Realtime Effects
- Realtime effects are audio effects you can hear applied immediately during playback without permanently altering the original audio file, letting you adjust parameters and audition processing interactively.
- They run non-destructively in the playback path (not written into the audio until you render or export), which speeds up experimentation and helps match settings before committing to a destructive change.
- In Audacity, real-time effects are available as “Real-Time Preview” or specific real-time effect plugins; use them to audition EQ, compression, reverb, or other processors while listening, then apply (render) the chosen settings when satisfied.
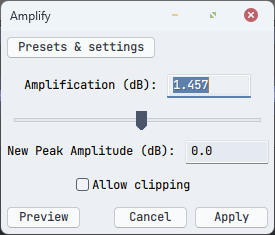
Amplify
- Amplify is an effect that increases or decreases the volume of a selected audio region by a specified number of decibels.
- When you open Amplify, Audacity calculates the maximum amplification that won’t cause clipping and shows a suggested value; you can also enter a custom dB value. Positive values increase volume while negative values decreases it.
- Use Amplify to make quiet takes louder, reduce overly loud clips, or match levels between segments.
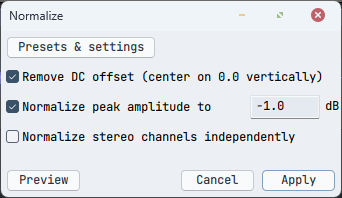
Normalize
- Normalize is an effect that adjusts the peak amplitude of a selected audio region so the loudest sample reaches a specified target level, without changing the relative dynamics within the audio.
- When you run Normalize you set a target peak (for example -1 dB) and Audacity scales all samples proportionally so the highest peak matches that level.
- Normalize is useful for matching levels between takes, preparing audio before final limiting.
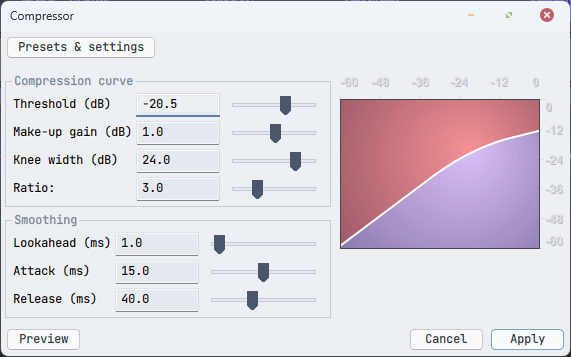
Compressor
- A compressor is an effect that reduces the level of loud parts of an audio signal above a set threshold, narrowing the dynamic range so quieter and louder passages sit closer together and the overall perceived loudness becomes more consistent.
- Compressor evens out inconsistent voice levels, makes quiet words easier to hear without raising background noise, and helps the voice sit better with music.
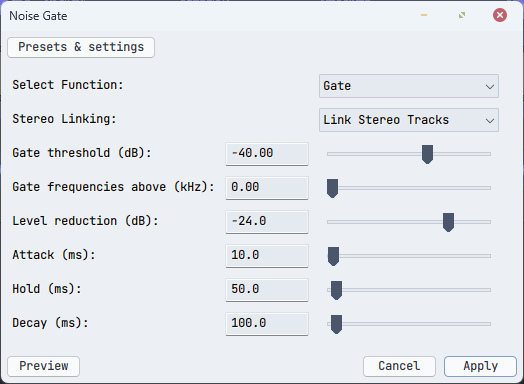
Noise Gate
- A noise gate is a dynamics processor that mutes or greatly reduces audio below a set threshold, letting quiet background noise fall away while allowing louder desired sounds (like speech) to pass through.
- It’s used to remove low-level room noise, steady hum, or microphone bleed during pauses in dialogue, or tighten up overdubbed tracks; but use conservatively to avoid chopping off natural breaths, sentence endings, or soft consonants.
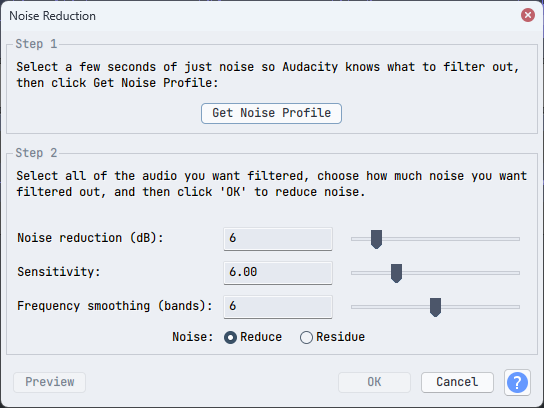
Noise Reduction
- Noise Reduction is an effect that reduces steady background noise (like hiss, hum, or fan noise) by analyzing a noise-only sample and subtracting that profile from the rest of the audio, improving clarity without re-recording.
Filter Curve EQ
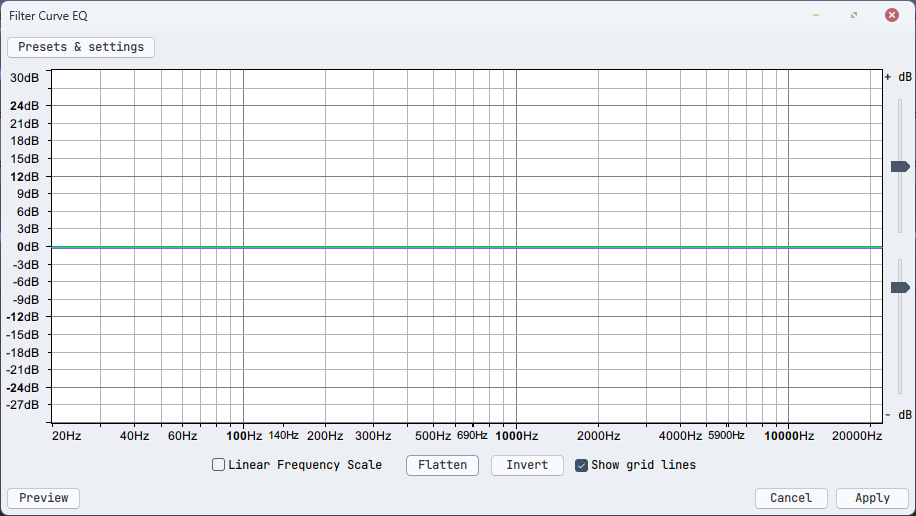
- Filter Curve EQ (equalizer) is Audacity’s graphical equalizer that lets you shape audio frequency response by drawing a frequency-versus-gain curve, boosting or cutting specific bands to change tonal balance.
- You open it, view a graph (frequency on the horizontal axis, gain in dB on the vertical), and add or drag control points to create boosts/cuts across low, mid, and high frequencies; changes are applied destructively when you run the effect.
- Common uses include removing low-frequency rumble with a high‑pass (cutting below ~80–120 Hz), taming harshness by reducing upper mids (~2–6 kHz), and adding presence by gently boosting around 3–5 kHz for voice; use subtle amounts (a few dB) and listen in context to avoid unnatural results.
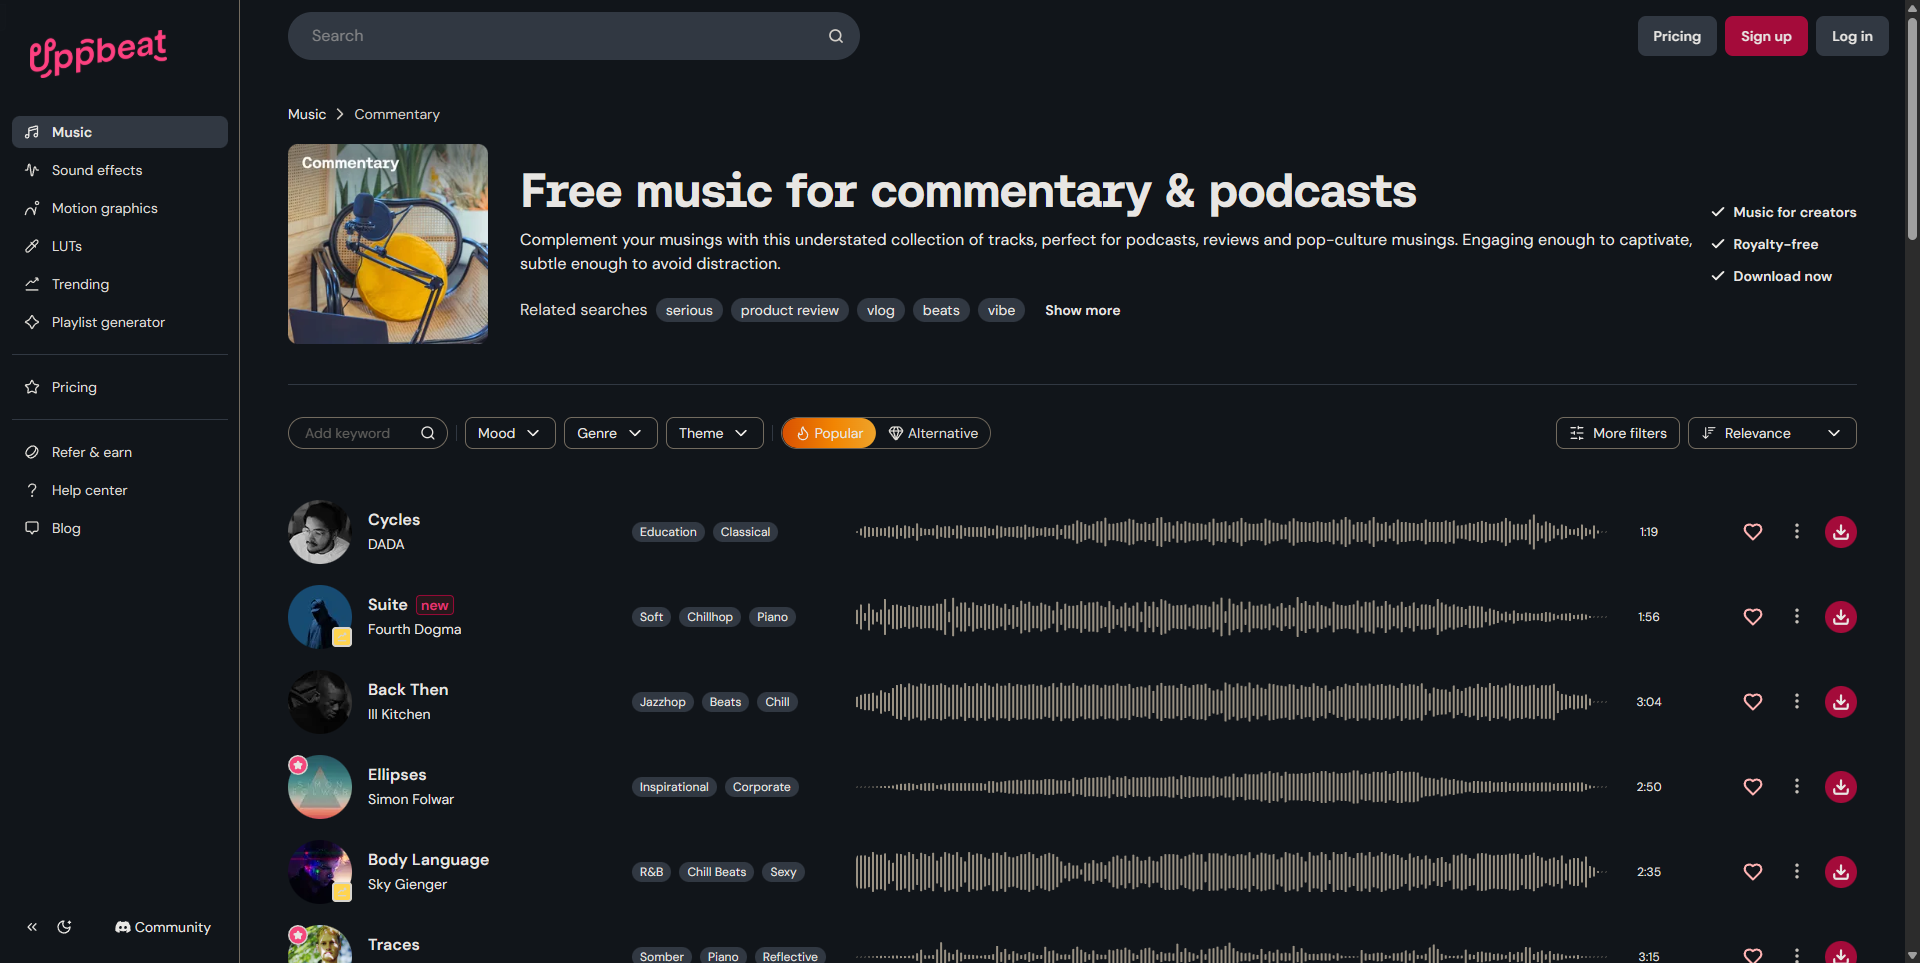
Background Music & Effects
- Background music is any music track placed under voice or primary audio to add mood, continuity, or production polish without drawing attention away from the main content.
- In podcasting it’s typically a low‑level music or theme cue used during intros, outros, transitions, or behind narration to reinforce branding and emotional tone, and should be mixed so it supports rather than competes with speech.
EQing Music
- EQing music is the process of using an equalizer to boost or cut specific frequency ranges in a music track to improve clarity, balance, and how it sits with other elements (like voice) in a mix.
- For podcast use, common EQ goals are to remove very low rumble with a high‑pass (below 60–120 Hz), reduce midrange frequencies that clash with speech (often around 200–500 Hz) to avoid muddiness, and tame harshness in the upper mids (2–6 kHz)
Fade in / Fade out
- Fading is a gradual change in a track’s volume over time; either increasing from silence to full level (fade‑in) or decreasing from full level to silence (fade‑out). It’s used to create smooth beginnings, endings, or transitions and to avoid abrupt clicks or pops.
- Fades are applied at clip edges or across overlaps to blend elements (like easing music under speech), and can be linear or use curved shapes to sound more natural for human perception.
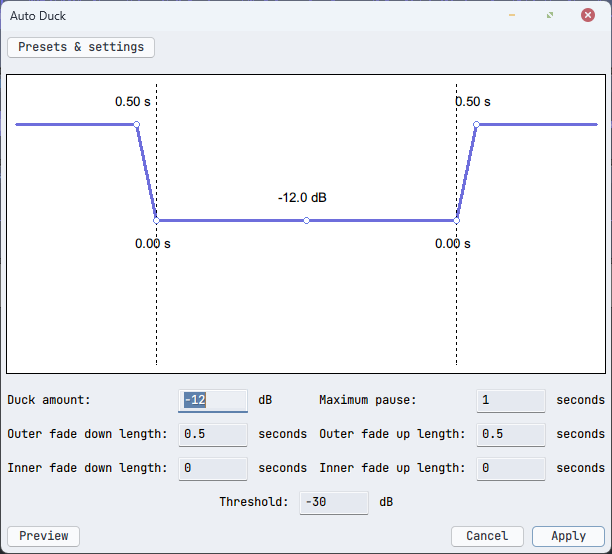
Auto Duck
- Auto Duck is a specific Audacity effect that automatically lowers the volume of a chosen track (usually music) whenever another track (usually voice) is playing, based on a sidechain-like relationship you define.
Exporting
- Exporting is the process of rendering and saving your Audacity project as a standard audio file (WAV, MP3, FLAC, etc.) so it can be played outside Audacity, uploaded, or distributed.
- When you export, Audacity mixes all audible tracks into a single file (unless you use Export Multiple to create stems) and applies any effects you’ve rendered.

General Advice & Best Practices
Recording
- Record each speaker on their own track to simplify editing and leveling.
- Use a good microphone with a pop filter and quiet room; reduce background noise at the source before recording.
- Set input gain so peaks sit around -12 to -6 dB to leave headroom and avoid clipping.
- Monitor levels with meters while recording; do a short test take first.
- Don’t stop recording every time you make a mistake, mark a short pause and pick back up from the start of your sentence.
Editing
- Save the project (.aup3) frequently and use versioned Save As before major edits.
- Duplicate tracks before applying destructive effects (compressor, noise reduction, EQ).
- Capture a noise profile (quiet section) and use gentle Noise Reduction if needed; prefer multiple light passes to one aggressive pass.
- Trim silences manually or use Truncate Silence, but preserve natural pauses; don’t over-tighten or your finished result will sound unnatural.
- Keep music well below voice level, it should never overshadow your voice.
- EQ voice tracks is a subjective and delicate process, each voice signature is unique. Start from a solid base and try multiple settings to see what fits your voice the best.
- Effect windows often have a preview button, use it to preview the result while tweaking parameters before applying.
- Listen on multiple playback systems (headphones, speakers, earbuds) before final export.
- Keep project notes and consistent file naming for episodes, stems, and exports for easy retrieval.
Bonus
- This section outlines bonus resources to check at your own time if you’d like to go deeper into the topic.
Useful Resources
- This section contains useful resources like websites and software relevant in podcast production.
Tenacity
- Tenacity is a free, open‑source audio editor and fork of Audacity created after changes to Audacity’s licensing and telemetry in 2021–2022.
- It aims to preserve a privacy‑respecting, community‑driven project that keeps the familiar Audacity interface and core features (multi‑track editing, effects plugins) while removing or avoiding features some contributors objected to in Audacity’s newer releases. Tenacity Nightly

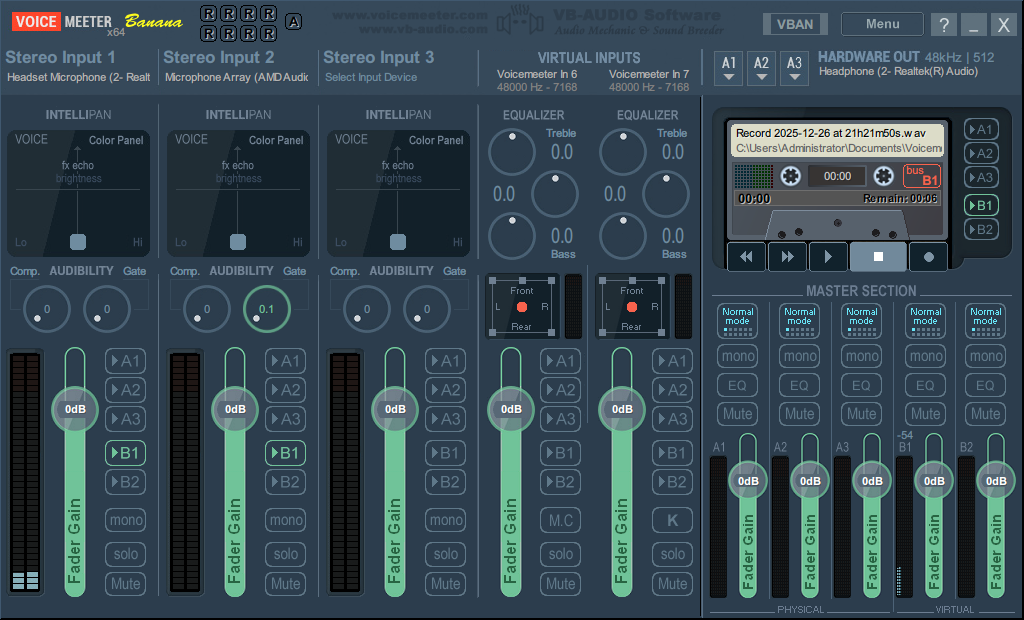
Voicemeeter
- Voicemeeter is a virtual audio mixer for Windows that routes, mixes, and processes audio between physical devices (microphones, speakers) and software applications, letting you combine multiple inputs, apply basic processing, and send a mixed output to streaming apps or recording software.
- It offers virtual input/output devices, hardware input strips, gain/pan/eq controls, and advanced routing.